Showing posts with label Artsy. Show all posts

Sunday, July 7, 2013

Preview: Bedroom Gallery Wall

I have been wanting to do a gallery wall in my bedroom for a while. We are very limited on space in our bedroom, but I still think it can be romantic. I've never done a gallery wall before and I want it to look collected and eclectic but I still want it to look like it "goes" together. 
Here are some of my inspirations from Pinterest. (I'm not sure of the source on the first one because the pin leads to nowhere.) 

Here's another- I like the many different things -besides frames-  in this one.  
Source: 
http://www.thehomesihavemade.com/2013/01/entryway-gallery-wall-entry-update.html?m=1

And this one is interesting because there is no art, just a few shells. I don't really like those gallery walls you see with just a bunch of empty vintage frames (first of all that would take you a fortune and twenty years to collect them- even though everything on Pinterest seems like you could buy it for three dollars at the thrift store and that's just not true)

Source: http://theinspiredroom.net/2011/03/08/love-fun-simple-gallery-wall-idea/

I'm  nervous that I will have either too many or to few items in the collection. Here are the things I'm including so far: 

1- the Mr and Mrs sign we had on our table at our wedding
2- a painting of a trumpet that I made for Tehran for his birthday even before we were officially dating 
3- two framed pictures from the wedding
4- a self portrait watercolor OR framed peacock feathers (can't decide yet) 
5- a round mirror from the thrift store, repainted white. 
6. A picturesque scene from our honeymoon with a twist ( more on that in the future) 

Here is my little round mirror: 
It was $1.99 at Salvation Army. I've had it for a while. I hate it when people say they got things for a couple bucks and you know that at your thrift store that mirror would have been $45 instead of $4.00. So I also offer proof: 


The next thing is my frame for either my peacock feathers or my self-portrait in water colors: it was also $1.99. I'm glad that this guy is oval. That should break up the shapes a little bit. 


Can't wait to get everything painted and hung on the wall! 


Monday, April 29, 2013

Menu board

I got crafty this weekend! It was kind of a lazy craft. I used a piece of scrapbook paper and a frame and an expo marker. These menu boards are all over Pinterest. I made one because my husband and I are trying to eat more meals at home instead of eating out. We take turns making dinner since we both have busy hectic schedules and work full time. In taking turns we wanted to be sure that we don't make chicken every single night, or two pork chops in a row or something. So I made this super cute menu board. Helps to attempt to be organized! Here it is, in use. Looks like its shaping up to be a yummy week!

Sunday, December 23, 2012

Boys Detective Kits

For Christmas this year, I asked my brother what I should get for my nephews. He said, anything artsy or scientific. They really like "Aunt Kiki gifts." Last year I made then super hero fort kits with sheets and various accessories with which to build a fort. Rave reviews. They have had hours of endless fun. Great. Now I have to be creative. So I looked on Pinterest, of course because we all know creativity is really stealing someone else's idea. I saw some detective kits. Great idea, and most of the stuff can be purchased at the dollar tree. But I popped into Michael's one day, and they had almost everything I needed and the rest of the stuff I picked up at the dollar tree. A lite time on the computer s d the printer, and voila. ... An "Aunt Kiki Gift"


Monday, July 30, 2012

Peacock Fascinators for the Bridesmaids- Tutorial

The peacock theme is coming together nicely!  I just love the colors and I love how each one is unique. 

I made a veil (you can see it later) with peacock feather accents, and I wanted the bridesmaids to have little fascinators as well. 

Here is my inspiration, an etsy store that sells them if you don't want to go to the trouble to make them yourself:  (Click on the picture to go to the store)


But since I did not want to pay $20 to $40 a piece for them, I made my own!!!  I bought peacock feathers on eBay from this seller : http://stores.ebay.com/naturesfeathers

They were $20 for 50 feathers.  I am going to use them in the bouquets too, so it was worth it.  The "stems" are not really long, but they are perfect for what I need.  You can get them cheaper if you order them from China or Hong Kong, but I wanted to get started right away, and did not want to wait for the shipping. And boy, was Nature's feathers fast!  I ordered the feathers LATE on a Friday night, and they came on Monday!  I started crafting immediately.  I made something for the flower girl, which I will post later. 

Today, I got around to doing the bridesmaid fascinators.  All six of them done, three months before the wedding!  I am feeling pretty good about where I stand, so that I will not be rushing.  I know that sounds niave even as I type it.

First, start with a felt triangle:

Next, trim the peacock feathers.  I just eyeballed it, and found a peacock feather with a large eye and one that was a little smaller.  Make sure you have sharp scissors and a steady hand.  This is like giving a feather a hair-cut. 


Here it is all trimmed up:

 Next, you need the "sword" feathers.  I did not have them, so I went to JoAnn and bought these in the floral department.  These are $5 a piece (but I had some kind of coupon, I can't remember how much I saved) and come with the sword feathers, some peacock feathers, and some little turquoise feathers.  I DID NOT use the peacock feathers from this floral thingy because they are much smaller than the ones I bought.  But they will be fine in the bridesmaid bouquets.  I needed 3 of these because they had two "sword" feathers each.  (the one picured has only one because I had already cut the other one off. 

I used one "sword" feather and two skinny turquoise feathers for each fascinator.  I arranged them on the triangle.  The best way to do this is to hold the feather and triangle up to your head and make sure that it is not sticking way way out and then hold it in place, bring it down to the table, and glue it. 


Next, I placed the peacock feathers down to get the arrangement just right.  After that, I squeezed out a pretty good amount of hot glue.  I gently placed the feather down and patted it into the hot glue.  I used this technique so the feather would not become separated while it is being worn.  

Glue both feathers down, and..... voila!


Some of the sword feathers curve to the left and others curl to the right.  All of my bridesmaids will be wearing them on the right, so I just made sure that no matter which way the sword was swooping, the fascinator looked right when I held it up to my head.


Now you need to attach the hair clips.  I hot-glued part of it, and I am also going to attach part of it with thread and needle. 


 I am probably going to add something sparkly to the tip of each one.  The next time you see these, it will be on my bridesmaids!


Saturday, June 30, 2012

Centerpieces


I just got a quote from a caterer for the wedding.  It is TWICE what I told them my budget was.  So I am freaking out.  So when the going gets tough, the tough get crafting, at least that is what my "aunt" Karen used to say.  Or maybe it was "the tough go shopping."  But since I have to spend three years of my future child's college tuition on a dinner and some chairs, I decided on cheap crafting instead.  I have been googling and spying etsy and everything I can think of for cheap centerpieces.  It seems that everything that looks cheap really ends up being 8 to 10 dollars a table.  That's not cheap.  13 tables x 10 dollars a piece is $130.  Silliness.  For something that is just going to get thrown out. 

Could I make a cool centerpiece for like 2 dollars?  Have you met me?  Of course I can! 

I love tissue paper poms, but I thought just placing those on the table would be lazy.
Here is a pretty one from etsy:


But some other things I thought of doing started looking like more work than building The Great Wall of China, like these beauties.  I could do them, but that started looking like a TON of work to have a cluster of these on each table. 


 So I made a tissue pom and then added one more step- a light from Dollar Tree.  Voila!  Now I am going to throw some votive candles around it... but not too close..... and maybe throw some flower petals on the table and its done.

Here is the one that I made today, sitting on the coffee table.  It is a little wonky because I was playing with it a lot, adding tissue paper, removing tissue paper, just all-around experimenting with it, so it is a little beat-up looking. 


This one workds because I can make it for a few cents worth of tissue paper (fewer sheets actually let the light shine through better) and a Dollar-tree light. 

Here is the Dollar-tree light.  The tissue paper is just resting on top of the light.  For the real one, it will be affixed with tape or something.  Or perhaps the bottom layer of tissue will just be wrapped under the lamp.    The lights are battery-opperated, but Dollar Tree has inexpensive batteries too. 


What do you think? 

I really shouldn't post until I make a pretty one.  I have a fear that people are going to steal my idea, take a better picture, and post it to their blog and get a million hits and take all the credit.  But then I remembered that no one really reads my blog like that.  Lol. 

Sunday, June 24, 2012

Handfasting

Getting ready for the wedding! I really am sick of the unity candle, and my sister already did the sand ceremony, and if someone else that I know did it at their wedding, I don't want to do it at mine.  Different Bride.  That's me. 

"Jumping the Broom" is an African-American tradition from before the emancipation proclamation, but I wasn't really sure if I wanted to do it because I am not African-American, nor were my ancestors enslaved nor forced to create their own marriage ceremony out of thin air because they were prohibited from traditional legal ceremonies.   I thought it might be weird if I did it too since I did not share this past.  But then I remembered. . . oh, yeah, wait, I AM weird.  So I decided to jump right in to that tradition. (pun intended)

But it got the teacher in me thinking about what I could do to incorporate things from the heritage of BOTH of us, and use it as a "lesson" to our guests about our two different cultures.  (I PROMISE NOT TO MAKE THE GUESTS FILL OUT A COMPARE AND CONTRAST WORKSHEET, maybe...)

 I saw "Irish handfasting" on Pinterest, and thought that would be a good idea.  I did a little research and found that it is an ancient Irish custom that pre-dates the church in Ireland, but that the symbolism was so great for marriage that the church often kept it as part of wedding ceremonies, and "Christianized" it.  The Irish hand-fasting tradition is the origin of the term "tying the know."  Great!  I love etymology! 

(Click on the picture to read someone else's blog about it)


I learned in my research that the Irish tradition usually uses 13 different ribbons, each one a different color, and the colors each mean something different. 
(Click the picture to see what the colors mean)


I was thinking of doing that but I thought trying to tie 13 strands at once might be a little tricky.  Then, I found this verse that says "A chord of three strands is not easily broken"  Well, isn't that convenient?! 

I liked the idea of our hands being tied during the vows.  The tie is supposed to be loose enough so that you can slip out of it in order to exchange the rings.  (I guess rings are okay since we can not walk around tied together with cords.)

Then, I needed to add the words into the wedding ceremony.  So I wrote a little script for the pastor, incorporating all my ideas.

Here it is (below) What do you think?

Hand-Fasting

"Tehran and Kristen have chosen to participate in a couple of wedding traditions that honor their different heritage.  One of these traditions, from the bride’s Irish heritage is the ancient Celtic and Irish tradition of hand-fasting.  In pre-Christian Ireland and the times of the early church, it was commonly the way that couples were “married” before the church became involved with weddings.  This ceremony of hand-fasting is in fact the origin of the term 'tying the knot.'”


"Will the bride and groom please cross and hold each other’s hands"

(officiant wraps the chords around the hands and ties a visible knot at the bottom)

"The couple’s hands are tied with a cord of three strands to represent the bride, the groom, and God.   They were inspired by this passage of scripture: "

Ecclesiastes 4: 9-12

Two are better than one,
because they have a good return for their labor:
10 If either of them falls down,
one can help the other up.
But pity anyone who falls
and has no one to help them up.
11 Also, if two lie down together, they will keep warm.
But how can one keep warm alone?
12 Though one may be overpowered,
two can defend themselves.
A cord of three strands is not quickly broken.

(Prayer)

Now we the bride and groom will exchange their vows.  (Chords are not removed until AFTER the vows)


He he, I love the one about lie down and keep warm- perfect for Chicago winters.  Now I have to write a little ditty for jumping the broom...

Saturday, June 2, 2012

Baby's First Birthday!

Liam is one!  I can't believe it.  My little sister's little baby now looks almost toddler-ish.  Oh well, time for a party then! 

I take NO credit for her super-cute decor, whatsoever. I just thought it was awesome and needed to be shared.

She set up a "smash the cake" photo-shoot a day in advance and had a photo-bug friend come over and shoot pictures. These pictures are the ones I took, and they are not quite as good as her friend's pics, but I do have the rights to these to post : )


Jenni is so clever, It was her idea to tape balloons to the back of the house and put out a blanket and snap away!  Those colors were her idea too!  The green and the blue are her go-to colors for everything (her wedding, the baby nursery-click here to see nursery, home decor...) and she usually just changes the accent colors.  This time, the accent is orange.

Party Table!

Hand-made banner by Jenni!

She spray-painted little dinosaurs from the dollar-tree to math the theme, and I hot glued them to a paper runner for decoration.

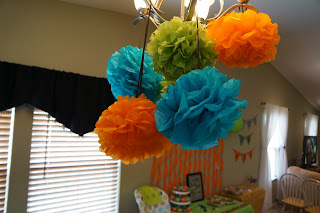
We made tissue-paper poms and hung them on the chandelier which my dad raised up with zip-ties so no-one would bump their head.  Okay, some people still bumped their head on the tissue poms but they were cute, so they weren't moving!

My sister has been practicing her icing skills, and even has the frosting tips and everything, like a good southern mama practicing her home-making skills.  Super cute cupcakes!

Here is the birthday boy, seeming happy about the attention. (Or at least the cake)


Jenni, Me, and Liam:


Sometimes, we party as hard as we can, and then we just can't eat one more bite of cake.  Happy Birthday, Liam!


Sunday, May 20, 2012

$8 closet makeover


I was inspired to organize by this blogger's post. She used dollar tree bins and tags that she made on the computer.  Cute!  And I have a desire to ba all organized and can't seem to pull it off, so anyway, one small closet at a time, right? 


Here is the before picture of the closet:


I bought 8 bins at the dollar tree and made my own tags.  I just did free-hand drawing so they are all different.  But I think that makes them cute.  I hot-glued the tags to the bins.


Here is the after:


The sheets had to go to another closet, but that's okay because there was room.  There was one left over bin so I used it for cleaning supplies under the sink.  I feel very accomplished, and the labels will help me and future hubby keep our things in the right places.